Description
Using switch S3 also allows manual control, allowing for curtains to be left only partially open or closed. The circuit controls a motor which is attached to a simple pulley mechanism, to move the curtains. I first started this circuit over 20 years ago and apart from now using metal gears, very little has changed.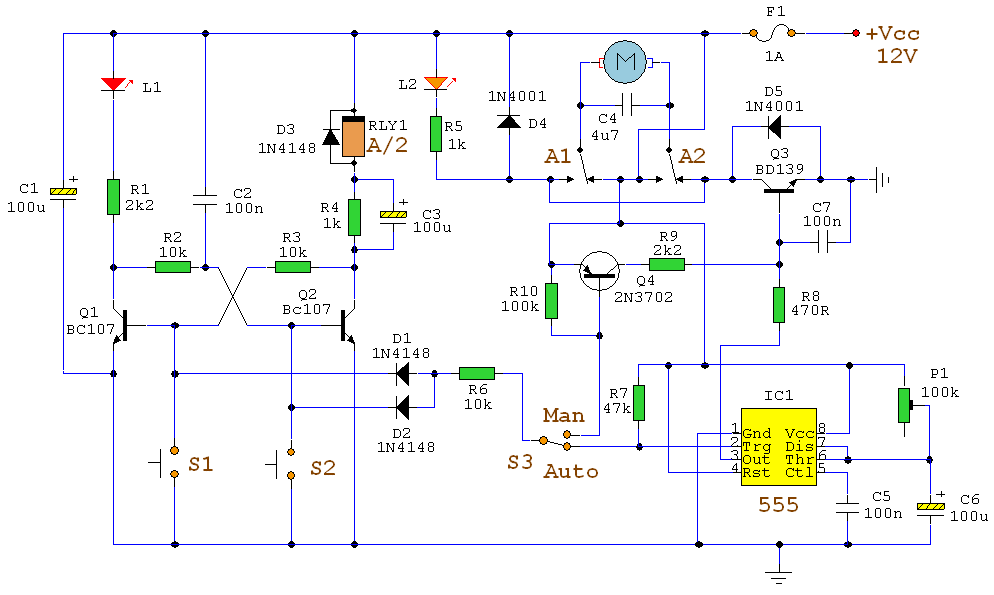
Notes:
Automatic Operation
The circuit can be broken down into three main parts; a bistable latch, a timer and a reversing circuit. Toggle switch S3 determines manual or automatic mode. The circuit as shown above is drawn in the automatic position and operation is as follows. The bistable is built around Q1 and Q2 and associated circuitry and controls relay A/2. S1 is used to open the curtains and S2 to close the curtains. At power on, a brief positive pulse is applied to the base of Q2 via C2. Q2 will be on, and activate relay A/2.
The network of C3 and R4 form a low current holding circuit for the relay. Relay A/2 is a 12V relay with a 500 ohm coil. It requires slightly less current to keep a relay energized than it does to operate it. Once the relay has operated, the current through the coil is reduced by R4, saving power consumption. When Q2 is off, C3 will be discharged, but when Q2 becomes active (either at switch on or by pressing S1) capacitor C3 will charge very quickly via the relay coil. The initial charging current is sufficient to energize the relay and current flow through R4 sufficient to keep it energized.
Q1 bias is applied via R3 which is tied to Q2 collector. As Q2 is on, the collector voltage will be low, close to 0v and therefore Q1 and LED L1 will be off. As Q1 is off, its collector voltage will be high, and Q2 bias voltage is applied via the chain L1, R1 and R2. The curtains should already be fully open.
If now S2 is pressed, the base voltage of Q2 will become 0 and Q2 will switch off. In switching off, its collector voltage will rise to the supply voltage and Q1 will now be forward biased via the relay coil A/2, R4 and R3. LED L1 will now be lit, relay A/2 will be de-energized and as Q1 collector will be low, Q2 will be off and the circuit latched in this condition.
At the same time as S2 is pressed, the trigger input of IC1, a 555 timer (normally held high via R7 will be taken low. A timing sequence now commences. Duration is controlled by preset P1 and C6 and the timing is adjustable between about 1 and 12 seconds. This delay is adjusted so that the motor will run for sufficient time to fully open or close the curtains. The output of the 555 turns on Q3, fed via R8 which now applies power to the motor via relay contacts A1 and A2.
At any time the motor is in operation, and for any direction, LED L2 will always be lit. Contacts A1 and A2 reverse the polarity of the voltage appearing at the motor terminals, for more help on relays and switch contacts, visit this page in my practical section. A running motor generates a back EMF and D4 and D5 prevent this voltage from destroying the IC and transistors.
Manual Operation
If the toggle switch S3 is changed to manual mode, operation is slightly different as outlined below. The bistable latch formed around S1, S2, Q1, Q2 and associated circuitry operates the same way as in automatic mode.
S1 and S2 set or unset the bistable circuit which control relay A/2 and determine the direction of the motor. In addition, as long as either S1 or S2 is held pressed, a bias current will flow through either D1 or D2 and R6 into the base of PNP transistor Q4. This small base current results in a larger collector current flowing via R9 into the base of Q3. The BD139 will now be fully switched on and drives the motor as long as either S1 or S2 is pressed. Hence it is now possible to partially open or partially close the curtains. If you prefer a manual control then the following simpler electrical circuit is available.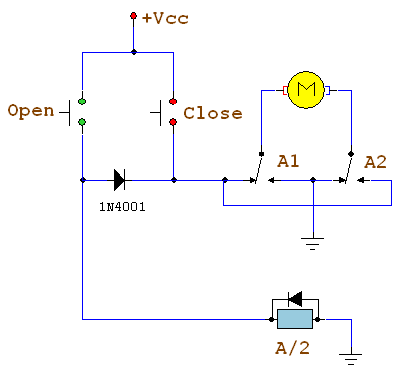
The close switch applies power to the motor via the relay contacts. The 1N4001 diode prevents the relay from operating. When the open switch is pressed, the relay is operated and power is again applied to the motor, though this time the contacts have changed and the motor will turn in the opposite direction.
Mechanics:
This is not the best mechanical system and I am always open to new ideas and suggestions. Originally I started out with a plastic worm gear and plastic 50 tooth gear, always in contact with each other. Then one day I forgot the gears were engaged and manually closed the curtains ruining the gears! I now use metal gears though plastic gears are perfectly suitable for this project.
This mechanism is suitable for the plastic or metal flat strip curtain rails only. Two pulleys are used at each end of the rail and a loop of string is passed around the pulleys and kept in place by a tension spring, see below. To get a better "grip" on the string metal pulleys with serrated flanges can be used; alternatively wooden pulleys may be used. The grooves may be slightly ruffled with a file to aid grip.
The string will always travel in opposite directions and a small hook or piece of wire is attached to each end fastener of each curtain and also to opposite sides of the string loop, see below.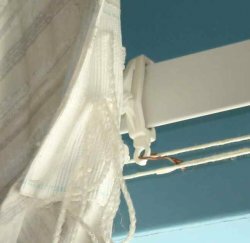
Each pulley is spaced from the wall with a bracket or small piece of wood. This is supported by a bracket or block of wood. A small Axel passes through each bracket, one end will have a collar, see below, the other end will have a gear that is driven by the motor.
At the motor end, I used two pieces of wood screwed together for the bracket. This now allows the motor to be moved away from the driven gear and un-mesh the gears. As each curtain is attached to the loop, moving just one curtain also moves the other curtain on the loop.
Friction - Friend or Foe ?
This mechanical design relies on one important property and that is friction. If there is too much friction the motor may not move the curtains at all and the pulleys may just slip. If there is not enough friction in the loop applied by the tension spring, the motor will drive the pulleys which will just turn and not move the loop at all. To overcome this, I use a silicone based furniture polish on the plastic rail, this reduces friction greatly and allows easy movement of the curtains along the loop. To tension the loop of string, fasten one end first to the spring then pull the free end of the string to tension the spring and fix it with cable fasteners or glue, see below.
This may require some adjustment to get right. To answer the heading friction in this case is both friend and foe, as the spring requires friction, the motor does not. The motor with drive engaged is shown below.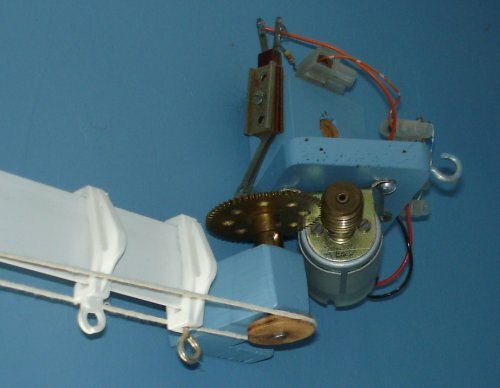
Depending on the length and weight of the curtains, the motor may have to be changed. I used a 12V hobby motor from Maplin electronics, I had to slightly enlarge the motor shaft with some brass tubing available from most hobby shops. The torque of the motor was not great, but if the output speed is reduced with gears, the torque (twisting force) is increased by the same amount. A worm gear has 1 tooth, and I used a 57 tooth gear, giving a reduction speed of 57:1. The torque of the motor (at the 57 tooth gear) is now increased 57 times. A light grease or machine oil may be applied to the gears, too much and it will splatter all over the walls and curtains!
Setting Up
This is best done with the curtains open, and motor gear unmeshed. Move one of the curtains by hand. They should move easily and meet in the centre of the rail, if not apply some silicone polish to the rail and alter the fastening on the wire.
Next switch the circuit to manual. With the curtains open, press the close switch. The curtains should start to close as long as the switch is pressed and stop moving when the switch is released. Then press the open switch. The curtains should now move as before but in the opposite direction. If all is well, open the curtains with the switch and then fully close them and use a watch to time this. The motor should be sufficiently slow and take a few seconds (about 3 in my case but my room is small).
Finally open the curtains, adjust the preset P1 to minimum resistance and set S3 to automatic. Press the close switch, the motor will run for a second or so and curtains will start to close. Switch back to manual and open the curtains, increase P1 slightly and switch back to auto and press close again. Repeat until the timing is sufficient for the curtains to close. Now press open (with S3 still in manual) the curtains should be timed to open fully.
Final Words
Should you have problems with this circuit, you first need to determine if its mechanical or electrical. Mechanical problems will happen on both manual and automatic settings, and be related to the opening or closing mechanism in general.
If electrical, check the power supply first, then L1 and L2 indications. If nothing works at all build the single manual relay circuit above and once perfected, return to the automatic version.
I am not mechanically minded so any suggestions or improvements towards a better mechanism can be included here; or if any of you have also made electric curtains, I will be happy to display your work.
No comments:
Post a Comment