


Warning:
The use of this device is forbidden to Pace-Maker bearers and pregnant women. Don't place the electrodes on cuts, wounds, injuries or varices. Obviously we can't claim or prove any therapeutic effectiveness for this device.
Parts:
P1______________4K7 Linear Potentiometer
R1____________180K 1/4W Resistor
R2______________1K8 1/4W Resistor (see Notes)
R3______________2K2 1/4W Resistor
R4____________100R 1/4W Resistor
C1____________100nF 63V Polyester Capacitor
C2____________100΅F 25V Electrolytic Capacitor
D1______________LED Red 5mm.
D2___________1N4007 1000V 1A Diode
Q1,Q2_________BC327 45V 800mA PNP Transistors
IC1____________7555 or TS555CN CMos Timer IC
T1_____________220V Primary, 12V Secondary 1.2VA Mains transformer (see Notes)
SW1____________SPST Switch (Ganged with P1)
B1_____________3V Battery (two 1.5V AA or AAA cells in series etc.)
Device purpose:
This is a small, portable set, designed for those aiming at look improvement. The Bio-Stimulator provides muscles' stimulation and invigoration but, mainly, it's an aid in removing cellulitis. Tape the electrodes to the skin at both ends of the chosen muscle and rotate P1 knob slowly until a light itch sensation is perceived. Each session should last about 30 - 40 minutes.
Circuit operation:
IC1 generates 150΅Sec. pulses at about 80Hz frequency. Q1 acts as a buffer and Q2 inverts the pulses' polarity and drives the Transformer. Output pulses' amplitude is set by P1 and approximately displayed by LED D1 brightness. D2 protects Q2 against high voltage peaks generated by T1 inductance during switching.
Notes:
* T1 is a small mains transformer 220 to 12V @ 100 or 150mA. It must be reverse connected i.e.: the 12V secondary winding to Q2 Collector and ground, and the 220V primary winding to output electrodes.
* Output voltage is about 60V positive and 150V negative but output current is so small that there is no electric-shock danger.
* In any case P1 should be operated by the "patient", starting with the knob fully counter-clockwise, then rotating it slowly clockwise until the LED starts to illuminate. Stop rotating the knob when a light itch sensation is perceived.
* Best knob position is usually near the center of its range.
* In some cases a greater pulse duration can be more effective in cellulitis treatment. Try changing R2 to 5K6 or 10K maximum: stronger pulses will be easily perceived and the LED will shine more brightly.
* Electrodes can be obtained by small metal plates connected to the circuit's output via usual electric wire and can be taped to the skin. In some cases, moistening them with little water has proven useful.
* SW1 should be ganged to P1 to avoid abrupt voltage peaks on the "patient's" body at switch-on, but a stand alone SPST switch works quite well, provided you remember to set P1 knob fully counter-clockwise at switch-on.
* Current drawing of this circuit is about 1mA @ 3V DC.
* Some commercial sets have four, six or eight output electrodes. To obtain this you can retain the part of the circuit comprising IC1, R1, R2, C1, C2, SW1 and B1. Other parts in the diagram (i.e. P1, R3, R4, D1, D2, Q2 & T1) can be doubled, trebled or quadrupled. Added potentiometers and R3 series resistors must be wired in parallel and all connected from Emitter of Q1 to positive supply.
| Hello to all my readers. Welcome to the latest of the bi-weekly Public Newsletters. – At least, it’s the latest until the next one’s published. Getting a good-looking date The first thing I’m going to tell you in this Newsletter is why I always write the date, online, as above in the title: - It’s all because of Americans. who make up around 1/4 to 1/3rd (0.25 to 0.34) of my readership. As you probably already know; Americans write the date differently compared to we Brits: Where an American would write the date above as 10.23.2009 Brits would write it as 23.10.2009 From the above it seems fairly obvious, provided that you are aware that they’re both the same day, that one is the date written by an American, and one is the date written by a Brit; particularly if you know that it’s the date related to an article published on 23rd October: There’s really no issue there; until it comes to a date like 08.09.2009, or 10.11.2010: One of those dates was written by an American, but which one? - So rather than cause any confusion by writing the date as 08.09.2009; which to an American is 9th August, yet to a Brit is 8th September, I write it out so that it can be understood whichever way round you do it in your part of the world. “Surely everybody knows what month it is!” You retort. Currently yes; but imagine you’re an American digging through archives, finding the post you’re looking for by date, loading it onto a USB stuck, driving to your next destination, and then finding that the post was written by a Brit and that you got the wrong post because you read the date in American format rather than British format. Blog Contents Page Next; I’ve automated the Blog Contents page: In doing so I’ve lost a number of the listings. Everything related to that is explained near the top of that page itself; but I’ll reproduce the important parts here also: - “Previously I was hard-coding each post into the list manually. I actually devised a way of doing it fairly quickly and with little effort. – I just wasn’t happy with doing things that way though: It was something else that had to be done, costing more time, and I also didn’t always remember to do it after every post’s publication. It is in the light of the above that I’ve configured an existing script to handle the matter of posting and updating this Blog Contents page. While the operation is almost perfect, the script is unable to handle [all the previously viewable entries in the list.] …I’ve just done the best I can for now. …Approximately 7 months of posts are currently listed, in total. I’m seeking a solution that will allow me to list more posts: Please bear with me until that time.” Changes to the Welcome Page As you may have noticed, I’ve partially automated the Welcome Page by adding a display of a snippet of my latest post to the page, as well as adding a clickable listings link to any of the latest 20 posts. I’ve also amended and partially rewritten the “Objective of This Blog” text section, in addition to which I’ve made all fonts on the page Trebuchet MS, and all linked text is now standard-link-blue (0000FF hex value.). Reduced input As I stated in the last Public Newsletter, I might yet have to reign back on the frequency with which I post articles at some point. It’s not that I don’t like writing; it’s just that I don’t have a lot of time some days or weeks. If there’s no content added to this blog one day, don’t instantly assume that it’s died. – Anyway, I currently announce future content on the welcome Page, previous to publication, so I’ll announce any gaps too, or simply won’t announce when there’ll be no new material. – If it’s not announced then it won’t happen. Yes I do hand-code that announcement; although if anybody knows of a plugin which will list articles scheduled for publication then I’d be most happy to know about it myself. – With WordPress there’s normally a plugin for it, whatever it is. – It’s just a matter of finding it. I’m going to be producing a different type of content as well as free articles from this coming Monday onwards; that being paid-for premium content, which will be on sale in due course: Yes I’m beginning to step up a gear with monetising this blog. – Well something’s got to pay the rent. As a result I’ll be unable to produce as many articles as I have recently been doing – I just don’t have an unlimited amount of time on my hands. I can probably still produce a few per week for the forseeable future; but if you have something technical and factual that you’d like to post on this blog; be my guest, literally: Submit your prospective guest-posts in line with the contest Can Your Post Make it to The Number One Slot? You never know; you might win. |

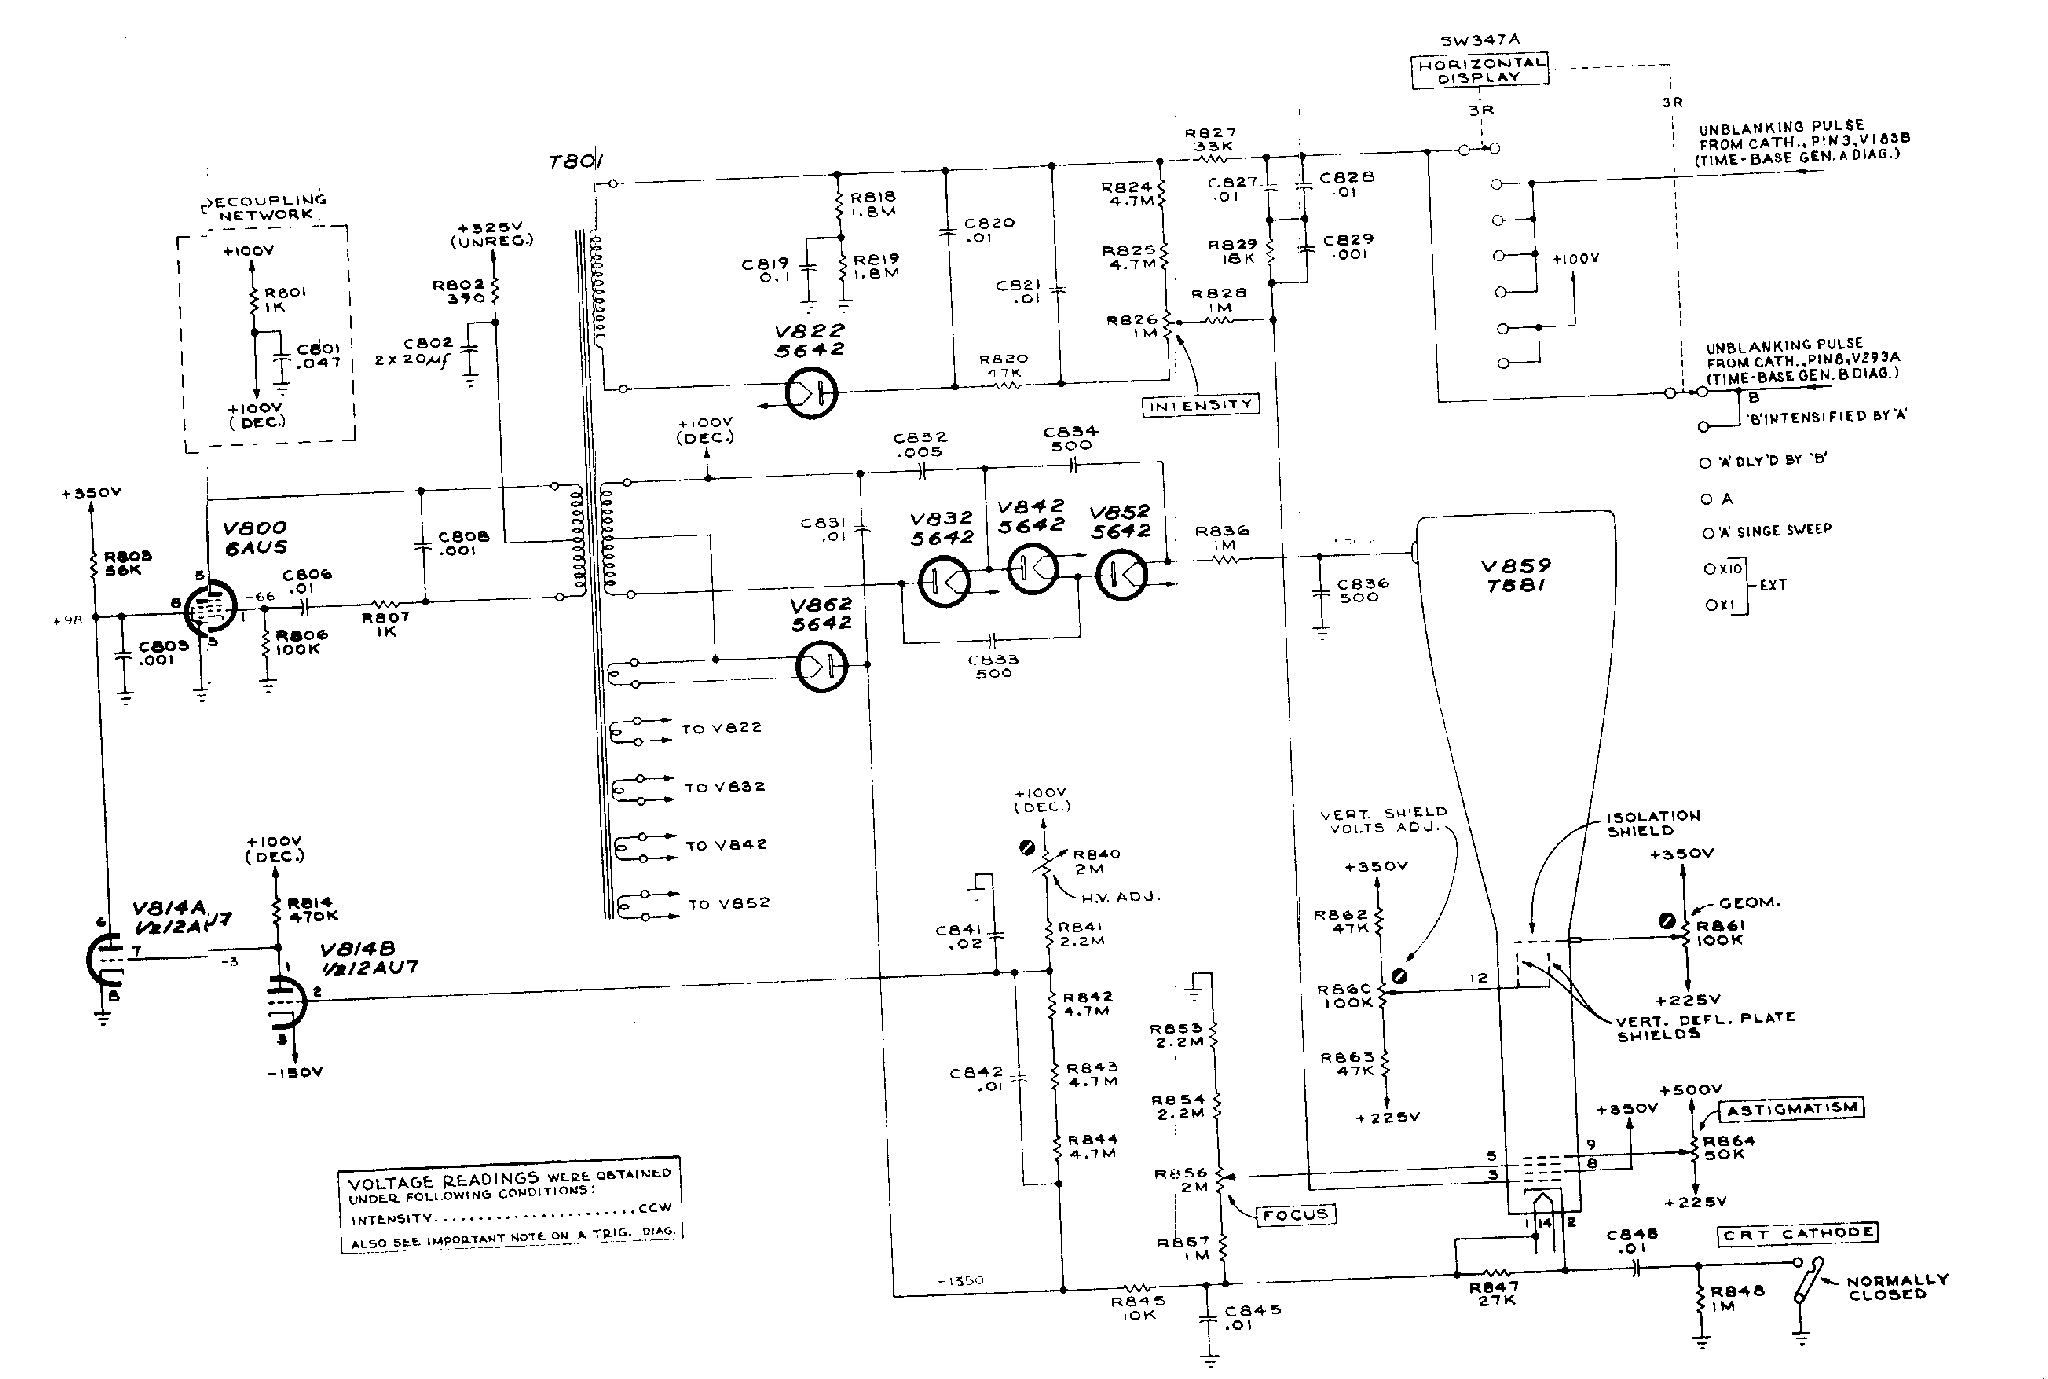
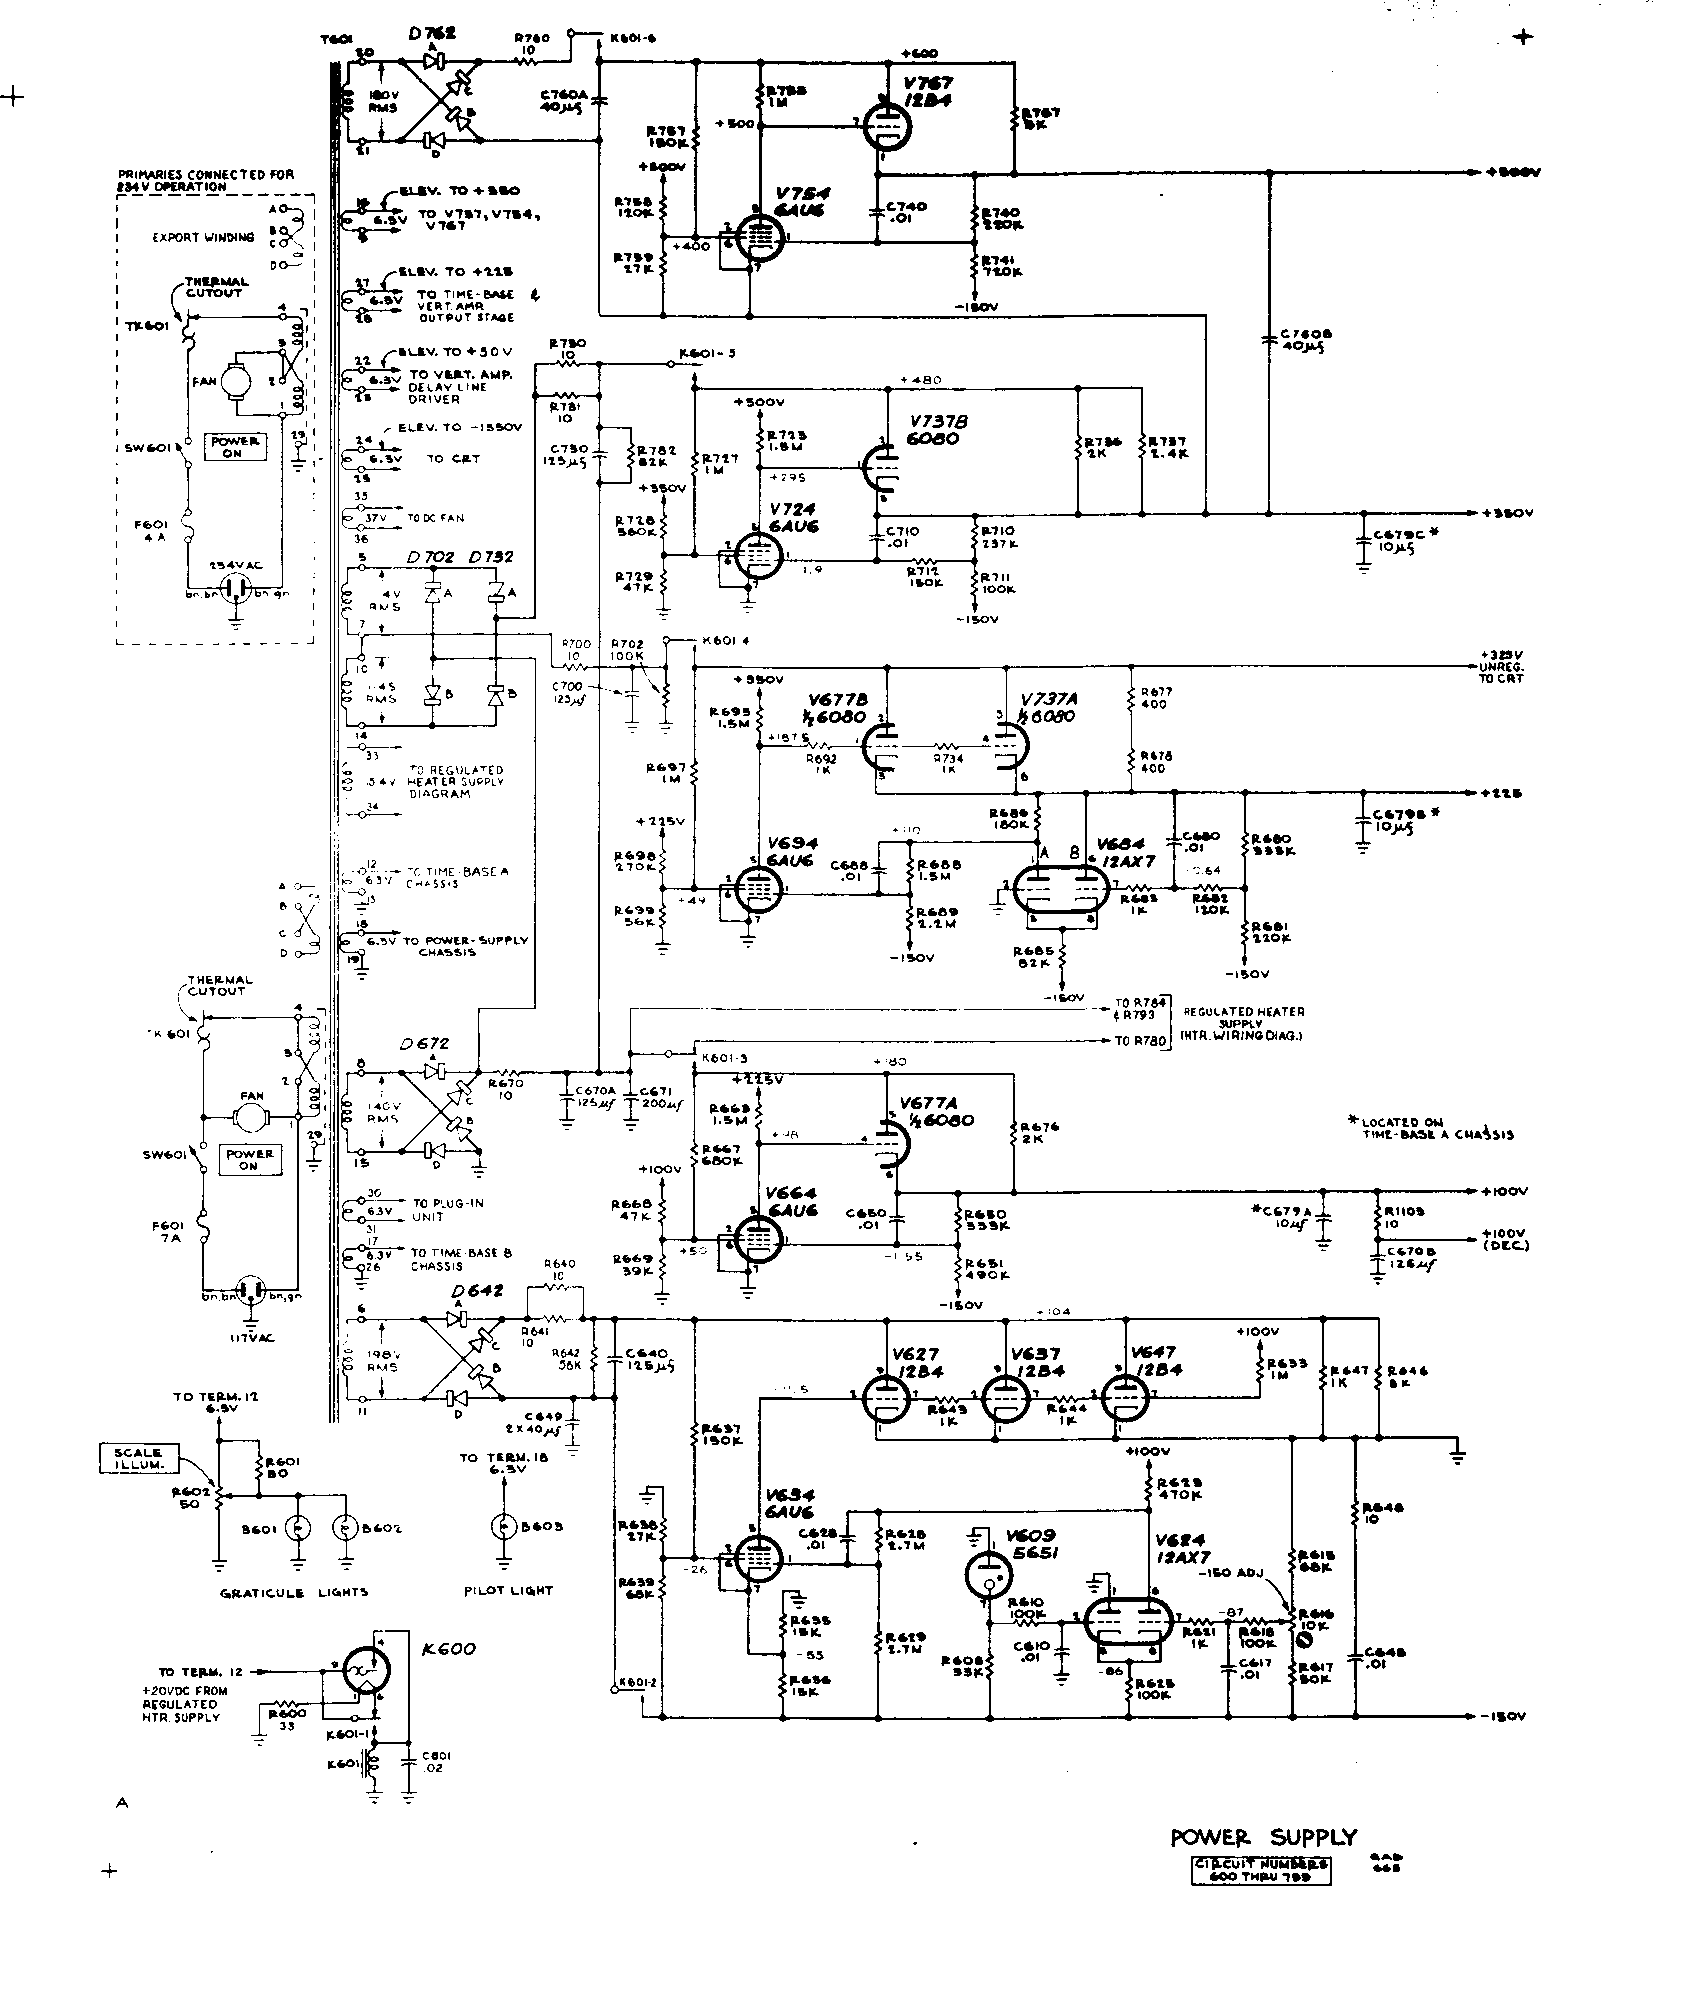
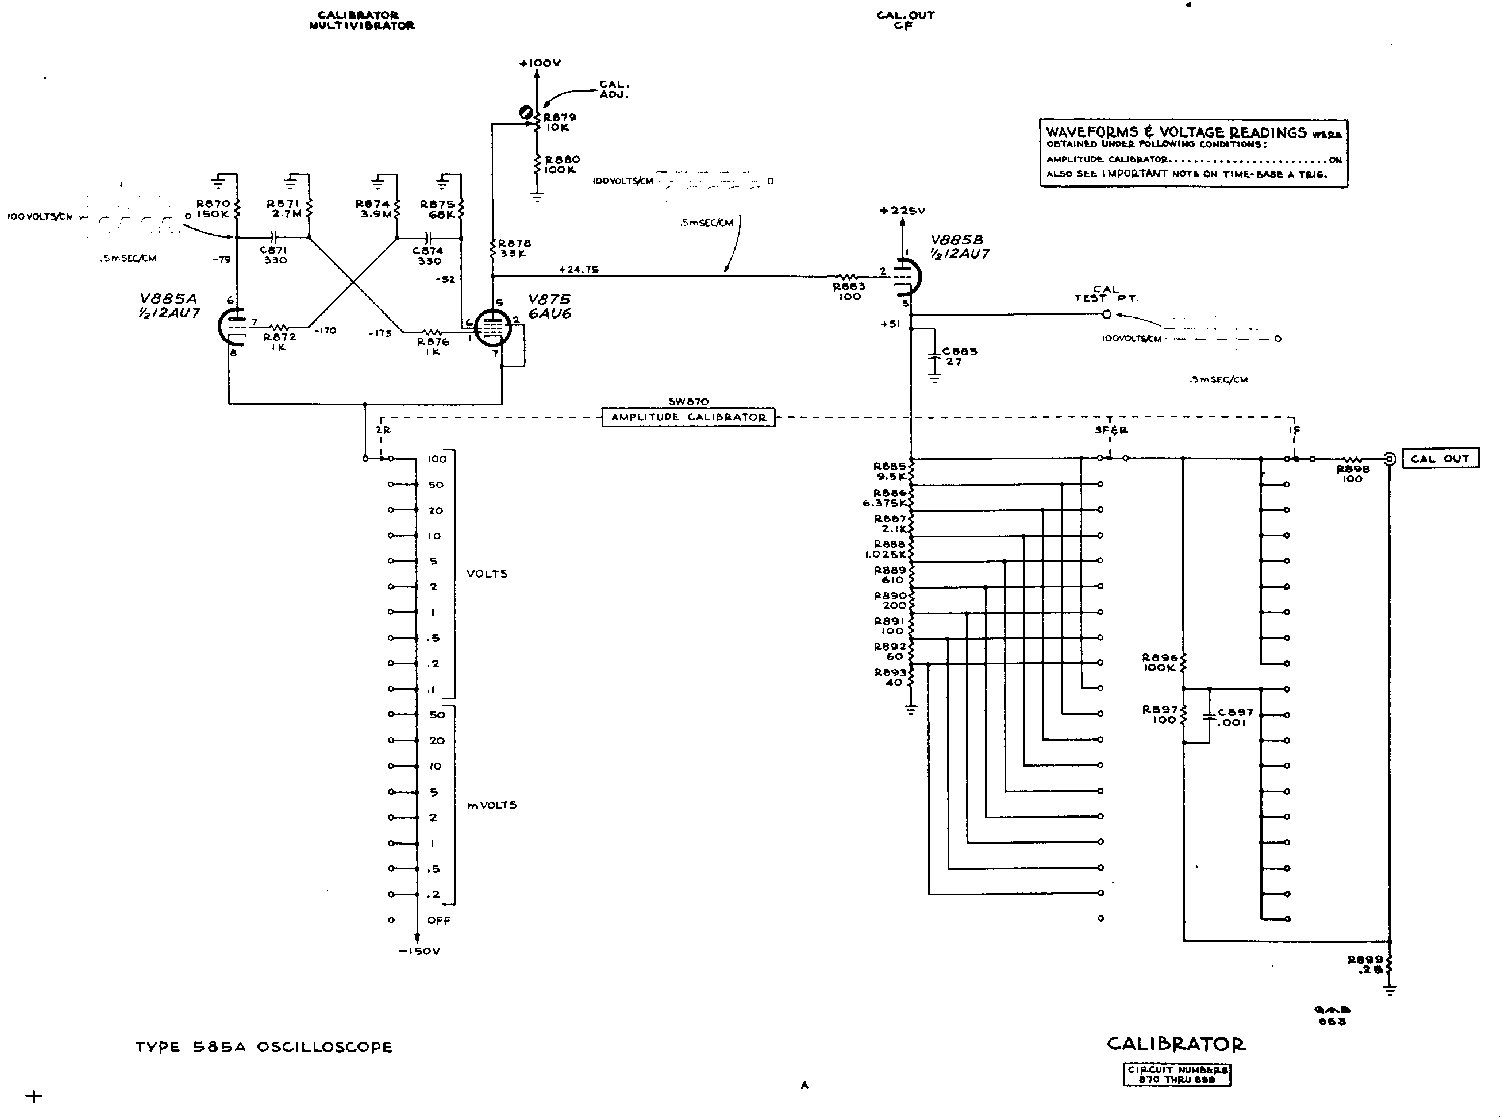
And for all those poor souls having just found their first Tek and unsure on how to proceed, finding the poor thing dead and not having a manual, I have here some useful bits of circuit diagram. These I copied from the Tek 585A manual, but I believe them to be reasonably representative of most 530, 540 and 580 series scopes. You may wish to disagree, please let me know. Note: Tube numbers for the non-A versions are different.
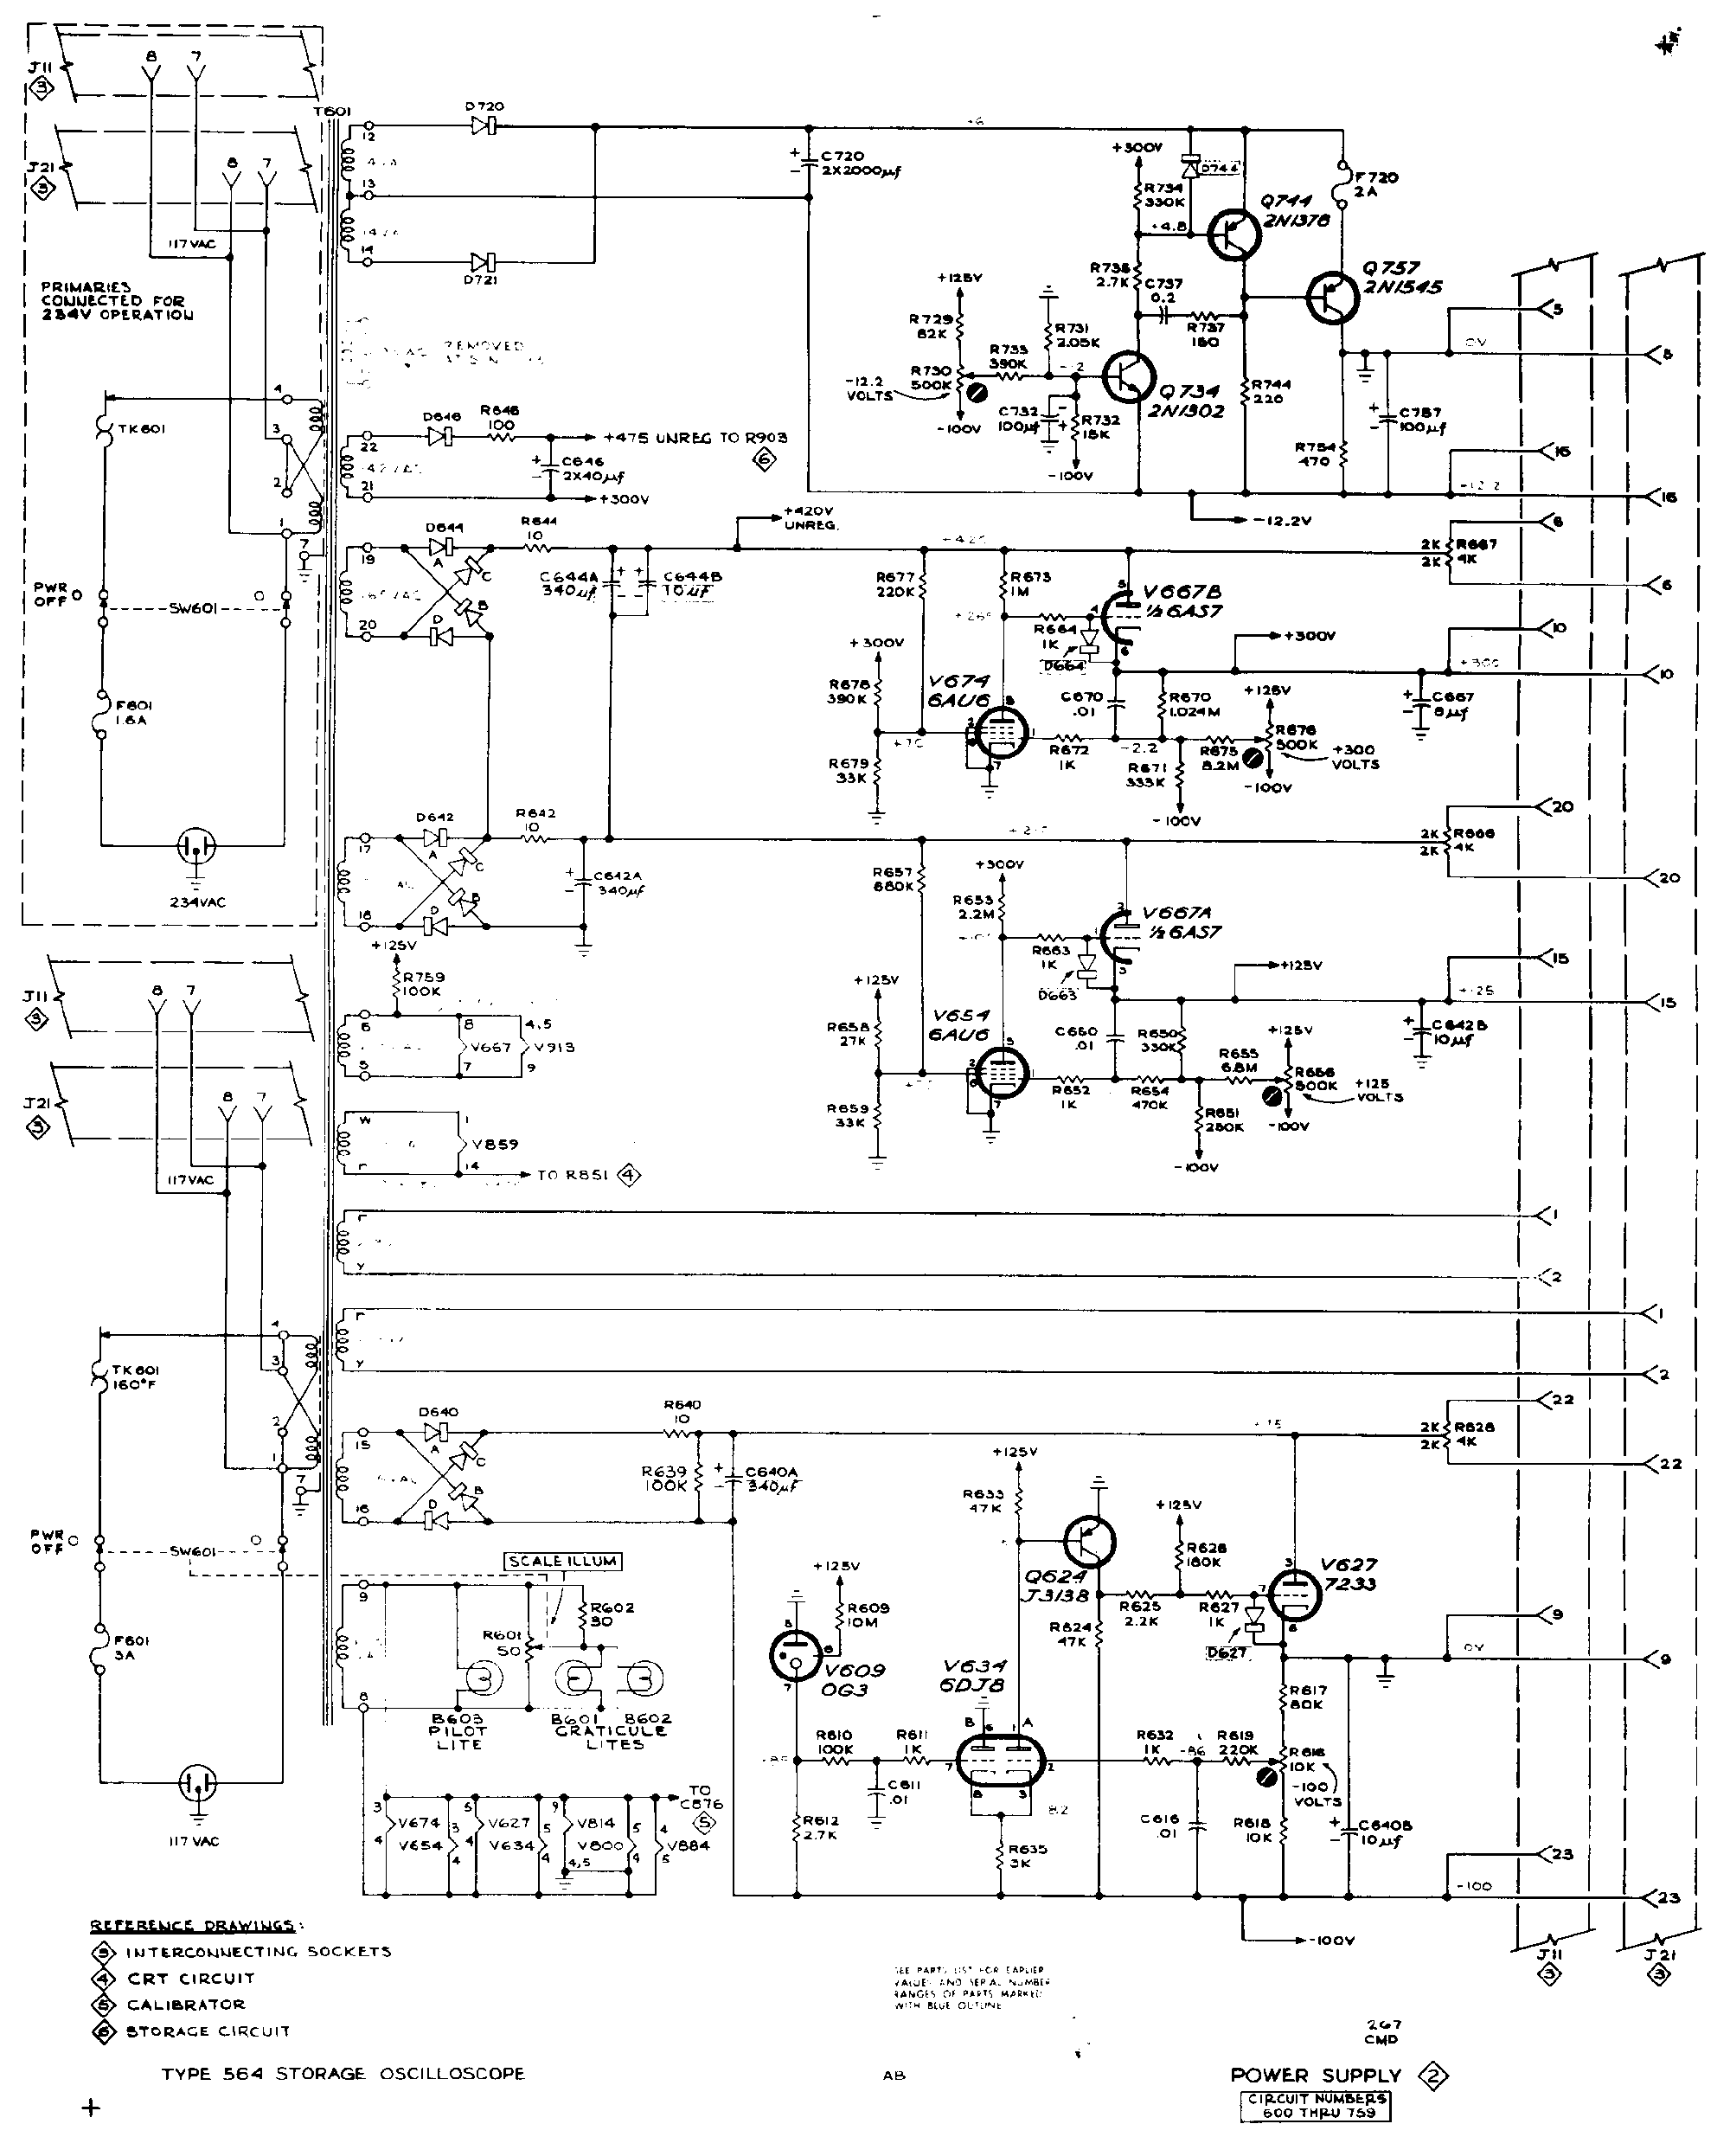
Here is something similar for the 560 series of scopes. The diagrams are from the manual of the 564, but I suspect the 561 will be largely identical. I don't know about the 560 itself. The 564B is different.
Notes: See above.
 Kindly offered to the ham community as freeware, the K8 keyer by K1EL is an iambic keyer, embedded as software in a PIC chip. Its biggest advantages are that it is free (duh!), easy to build and very small.
The best implementation I have seen so far, is from W0PWE. He has circuit diagrams, PCB layouts and much more. The original presentation of this keyer can be found at K1EL’s homepage. You will need a PIC programmer to upload the software. I have one available on my Electronics pages.
The disk with the holes you see on the front of my memory keyer is in fact a small speaker that I salvaged from a set of defective cheap headphones. I found that piezzo speakers only give moderate output at the 800Hz the PIC puts out. I must say the headphones speaker doesn’t do any better, but it’s enough because my rig puts out a sidetone as well, and I have my headphones on anyway…
I run the keyer on a pair of AA batteries, which works very well. The keyer does not need an on/off switch, since the idle current of the PIC is only a few µA’s. I haven’t had to replace the batteries for two years.

